|
Click on any picture to see a larger version.
There are shops and there are studios. There are workbenches and there are works of art,
masterpieces of furniture in their own right. For me the bench is the means to an end and is
primarily utilitarian. I opt for function over form. Admittedly, I would love to have a
Sjobergs
or
Roubo style
bench, although it may be a misfit feature in my humble shop. I have learned a
man can always produce more with what he has, rather than dreaming about all he could do with
what he wished he had (even all the "right" tools and "quality" tools will fail to impart the most
important ingredient to their wielder – talent). Based upon that premise, and my preference not
to spend the time, effort and expense building a classical bench, I refurbished my bench in the
spirit of Ozark Renaissance. While there are a plethora of resources and examples of
workbenches, this article is intended for those who want to resurrect and economically work with
what they have to produce an unconventional workhorse. It is no show pony, but it will be a
dutiful beast of burden to help you produce those masterpieces and works of art. Let the detailed
features be an inspiration, rather than a blueprint.
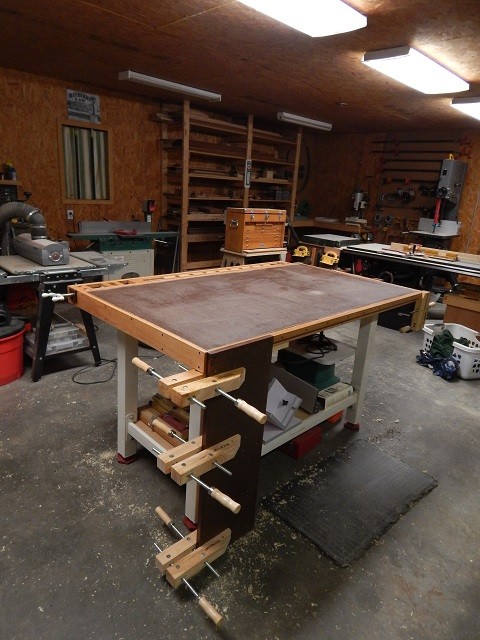
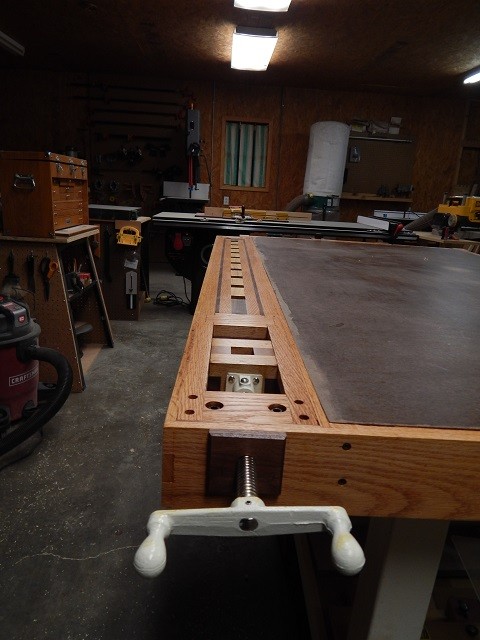
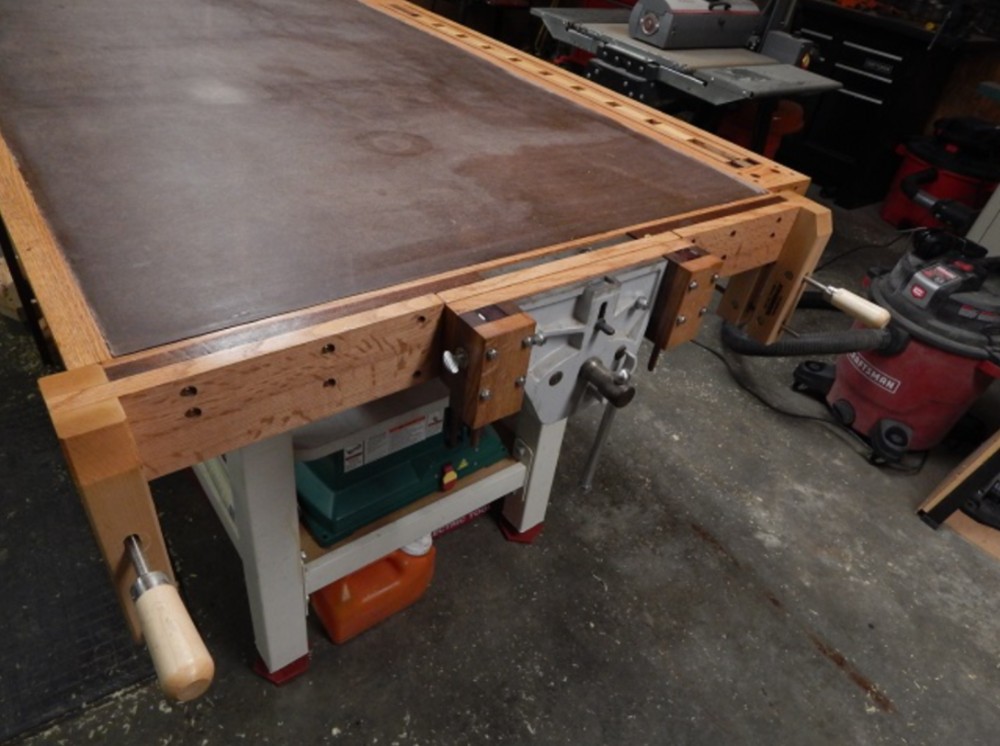
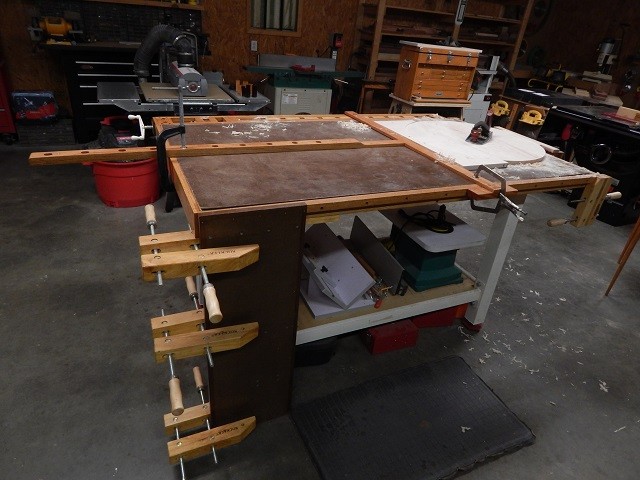
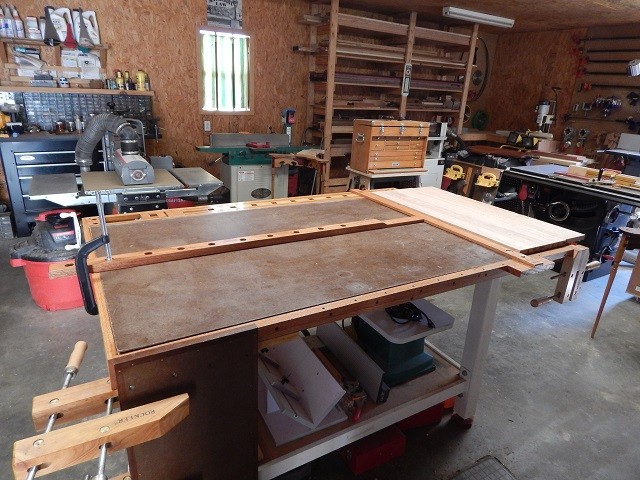
The majority of materials I used were items I had on-hand.
Purchased items did not exceed $25.00 per item. I built it as a
hybrid working/finishing bench and added modified features of the classical design. It is as eclectic as
the types and brands of tools in my shop. I began the refurbishment by
stripping it down to the Shop Fox brand metal legs/frame and built a
sub-base from 2x8's overlaid with multiple layers of plywood and
skirted with quarter sawn red oak that I had milled and air dried. The
top is tempered Masonite, and measures 42.5" x 67" overall. I
added a modified leg vise, tail vise and modified end vise with
retractable dogs and affixed handscrews (not visible at far end in the photo below.

|
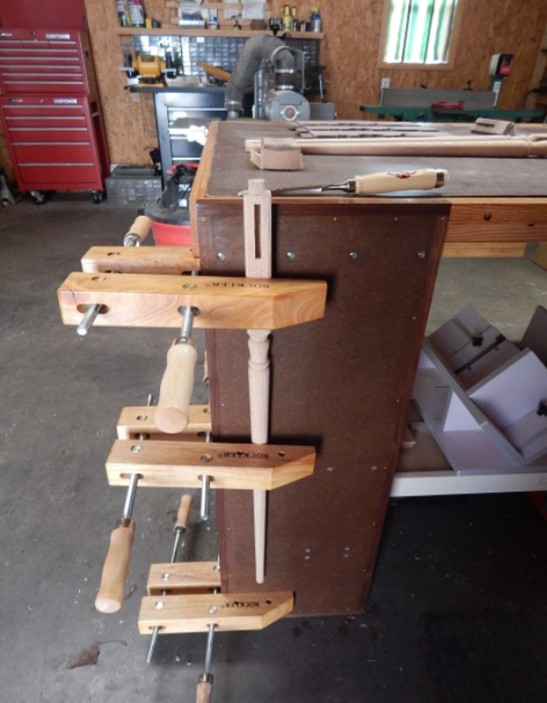
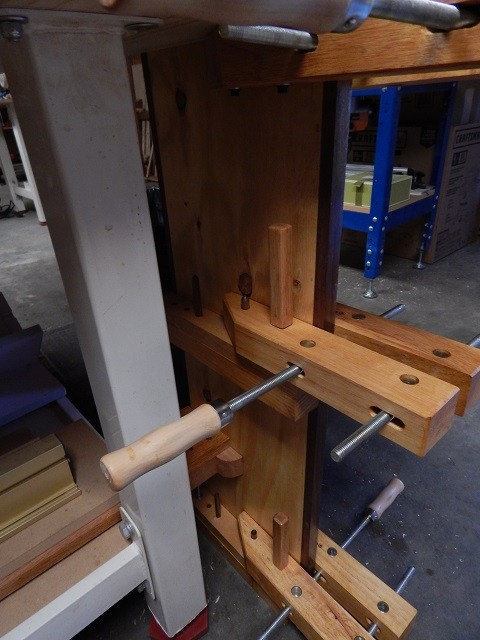
Leg Vise
I built this in the spirit of the classical leg vise to accommodate vertical clamping of legs, table
tops on-end, skirts, stretchers, and any odd shaped pieces. What it lacks in convenience of
operation it makes up in versatility. It consists of tempered Masonite affixed to 3/4" plywood
with 3M adhesive. I framed it in walnut with tongue and groove and pinned the walnut tongues
through the Masonite/plywood with 1/8" birch dowels around the perimeter. The top of the vise
frame is even with the top of the skirt/work surface, and flush with the red oak clamping lip
along the edge of the bench.
The top 12" handscrew is fixed permanently and screwed through the jaw to a cleat on the
underside of the table edge. The top portion of the plywood face is also screwed to this cleat.
The middle and lower handscrews are removable and reversible. Although they are dedicated to
the vise, I can additionally use these handscrews for other clamping requirements on projects not
associated with the bench. Not every vertical project requires the use of all three simultaneously.
One advantage to this design is the elimination of vise racking due to the adjustable nature of
handscrews and the ability to clamp odd shaped items or pieces at an angle vertically/slanted. I
considered adding a dead man to augment the leg vise's ability to hold long material, but opted
against it for my purposes. I am a shellac fiend and mix all of my own concoctions. The entire
table and leg vise, including maple handscrews and tempered Masonite are well saturated with
the flavor of the day: super blonde, Kusmi #1 or #2, Bysakhi, etc. I just love shellac – God's
gift to woodworkers. I am sure He made lac beetles right after He made trees.
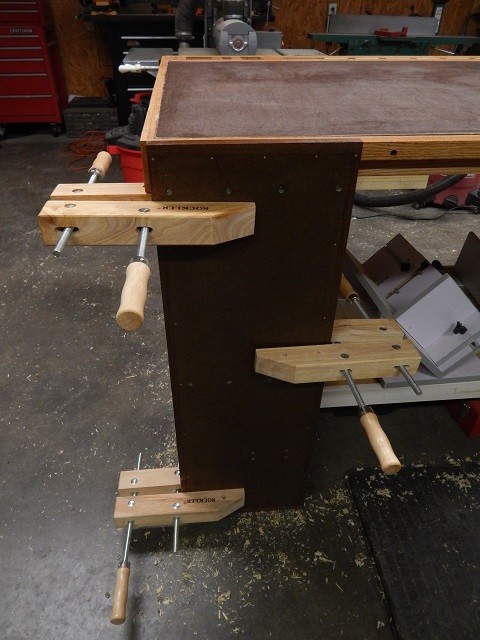
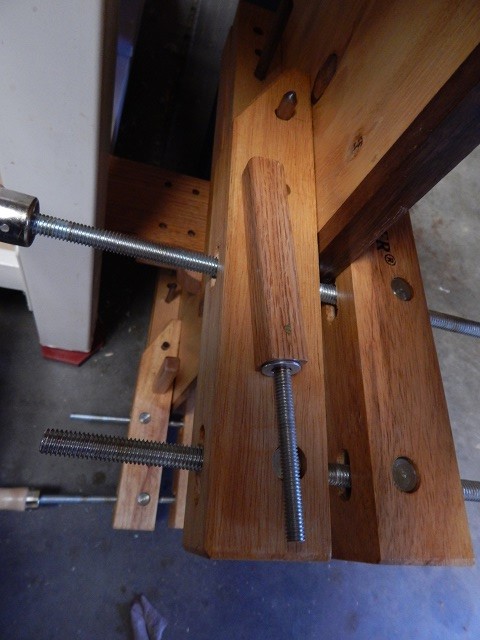
I attached a horizontal 1x5 red oak runner across
the width of the lower metal frame/shelf and
attached it to the frame with U bolts. I then
attached this runner to a red oak cleat on the back
side of the plywood face and secured them together
once I achieved 90 degrees as determined with a
large square and level. Obviously, I installed the
runner first in order to determine placement of the
mating cleat.
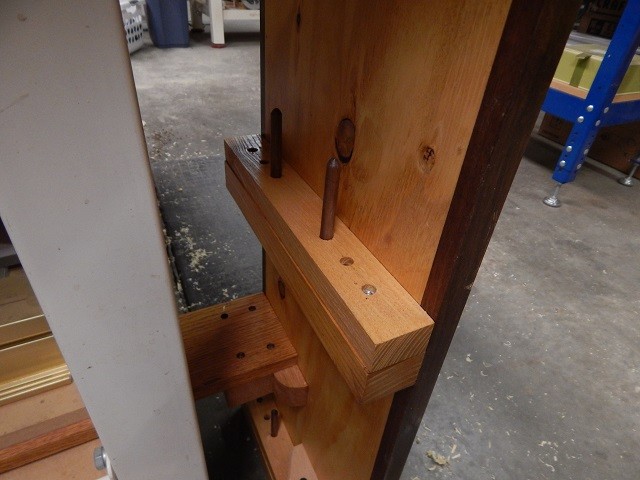
The middle and bottom handscrews are positioned
and secured via two hardwood cleats attached to
the back of the plywood face. I drilled two holes in
each of these jaws: one for a 3/8" walnut dowel
registration pin, and one for the threaded handle to
mate into a T-nut inserted from the bottom side of
the cleat. With the length of these jaws I found a
threaded handle alone insufficient to adequately
hold the handscrew, which the registration pin
remedies most efficiently. Installation of the
registration pins and T-nuts are mirrored on both
sides of both cleats to permit reversed attachment.
I fashioned the handles from 5/16" threaded rod and red oak and added a washer. I tapped the
handles and used epoxy for extra measure. I determined the length of the rods and cut them
just shy of bottoming out in the T nuts for a secure grip. The walnut dowel registration pins
are tightly fitted and glued as permanent features. And yes, don't forget to shellac those
handles!
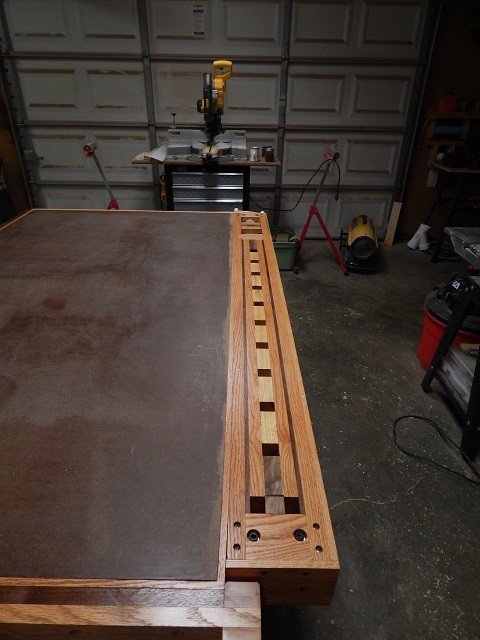
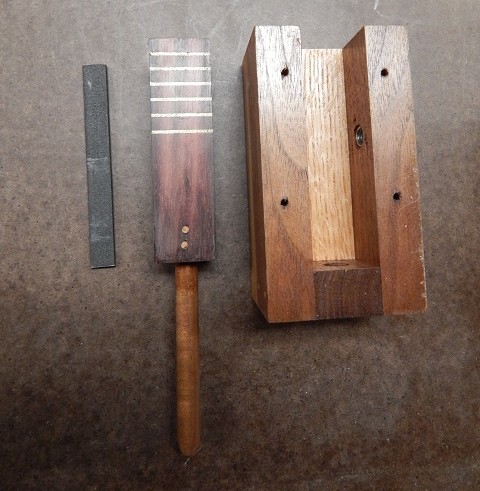
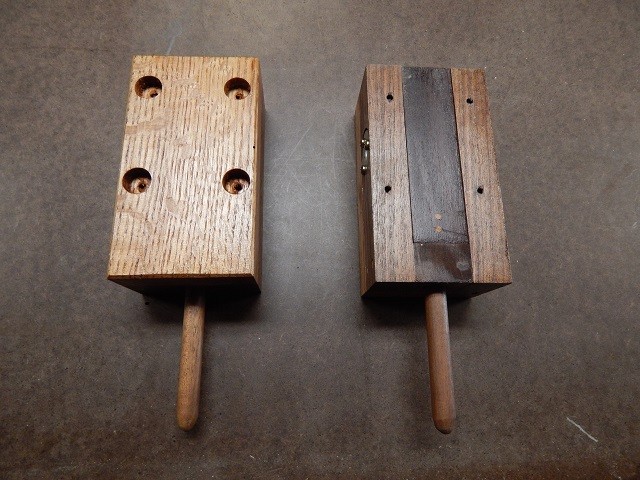
Tail Vise
I extended the width of the table by one 2x8 along its length to accommodate a tail vise and bed.
I built the entire vise and bed as a monolithic unit and then attached it to the table and extended
the skirt around it to encompass the entire table top. I built it just proud of the top and hand
planed it down to the desired height. The bed consists of red oak and walnut with ash dividers
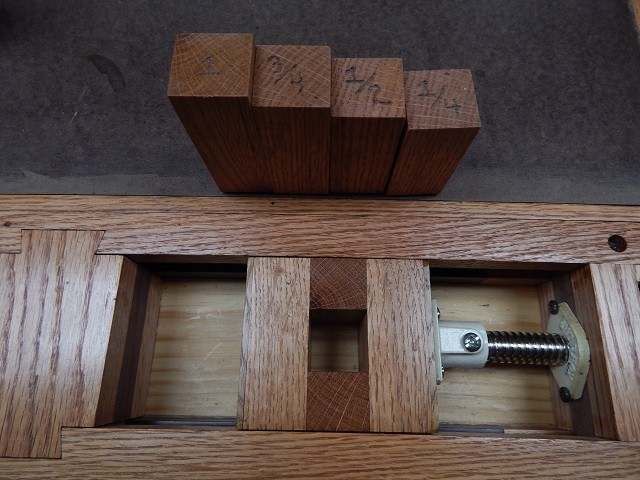
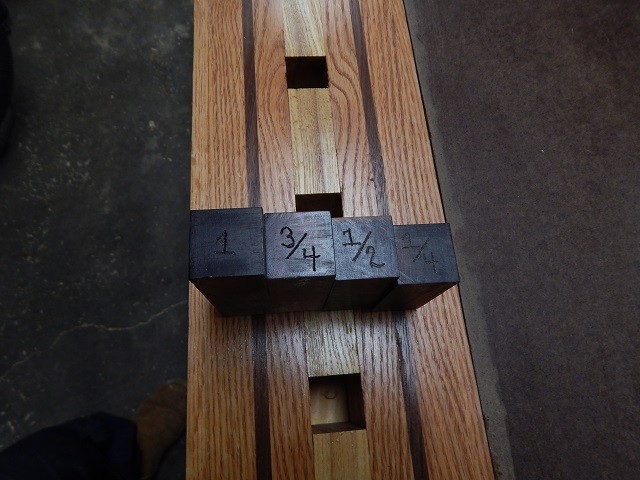
evenly spaced to create the dog holes at one inch square.
The dogs for the shuttle are red oak while the vise bed dogs are made of katalox with a Janka
rating twice that of red oak. Both sets are inscribed with their corresponding heights above
the top of the shuttle and bed for stock of varying heights. I used a metal hand engraver to
inscribe the numbers. Metal stamps would work equally well. Heavy on the shellac!
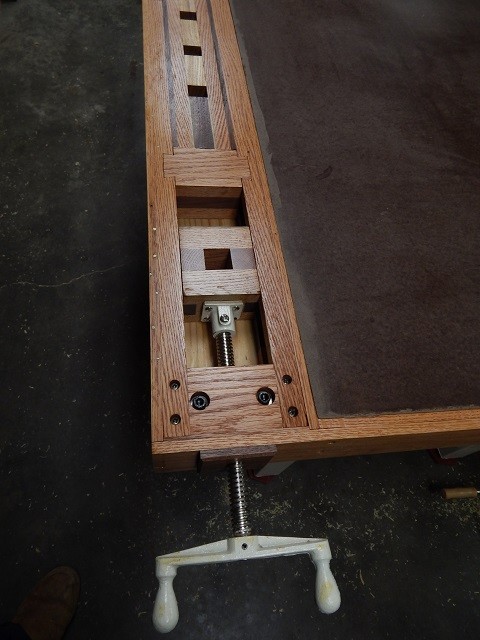
The bulkhead is dovetailed for maximum strength. I dispensed with an open bottom for vertical
clamping as the leg vise fulfills this role. Additionally, I did not want to compromise the
integrity and strength of the construction of the whole unit based on the overall design of this
bench. The shuttle consists of red oak and white oak with katalox rails on both sides that mate
into and slide on katalox runners in the walls of the vise bed. Katalox is also a great utility wood
for such applications due to its strength. It can be tapped for threads and performs similarly to
aluminum and is a good choice for friction applications, especially once it is oiled, shellacked
and waxed.
Commercially manufactured tail vise hardware is expensive, albeit aesthetically pleasing and
sometimes clever. I used a $22.00 veneer press and replaced the top shoe screw with a cap screw. I did
not glue the end cap of the vise bed or skirt to permit disassembly of the shuttle housing for repair or
replacement. It works very well and has never failed to maintain full pressure on a work piece.
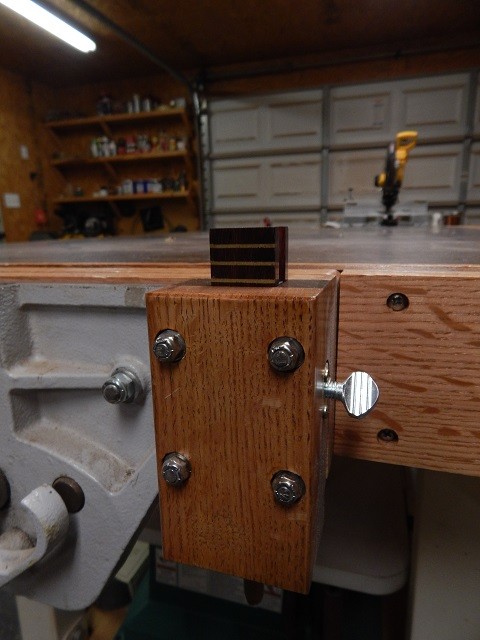
End Vise
In the spirit of economy I maintained use of my general purpose metal end vise, which is not
ideal for woodworking. Within the halls of the dream factory fulfillment department it would
not be on my list per se. I fitted it with quarter sawn red oak jaws and fitted a quarter sawn red
oak fascia board the width of the bench. I changed horses in mid-stream on design and ended up
with a segmented fascia board. Ideally, it should be (and I recommend) keeping this fascia board
monolithic. The vise arrangement itself is straight forward. However, due to the shorter jaws on
the vise I attached a ten inch handscrew to each end of the fascia board by drilling through the
fascia into the handscrew jaw, naturally countersinking all steel screws (jaw tips cut flush to top
of the fascia/skirt). To accomplish this I had to disassemble the handscrews, which required
removal of the pins in the handle ferrules that go through the threaded rods. I used Jorgensen
brand handscrews. To their credit in craftsmanship, removal of the pins with a punch and
drilling with a press was no small feat. I replaced these pins with Cotter keys once installed to
facilitate future removal.
The handscrews provide the same throat depth as that of the end vise and have proved
themselves quite handy at securely clamping stock six to nine feet in length. One unforeseen
hazard has been the occasional close encounter of the proctologic kind when inadvertently
bending over or backing into the handles while working around them: builders beware...
I was a little skeptical about my design with the retractable dog housings on the vise, but I was
compelled to install them. The handle of the vise must obviously clear the housings. I have been
pleasantly surprised with the unobtrusiveness and efficiency of them in spite of appearances.
Again, I constructed them with ease of access and removal in mind. They are bolted/counter
sunk to the vise jaw portions that extend beyond the metal jaw so no drilling through metal was
necessary. Allow me to whet your appetite by asking what you may have already noted. Why
did I install retractable dogs on the end vise when there are no dog holes in the work surface?
Bear with my detailing the dogs and housings before I answer that question in the next section.
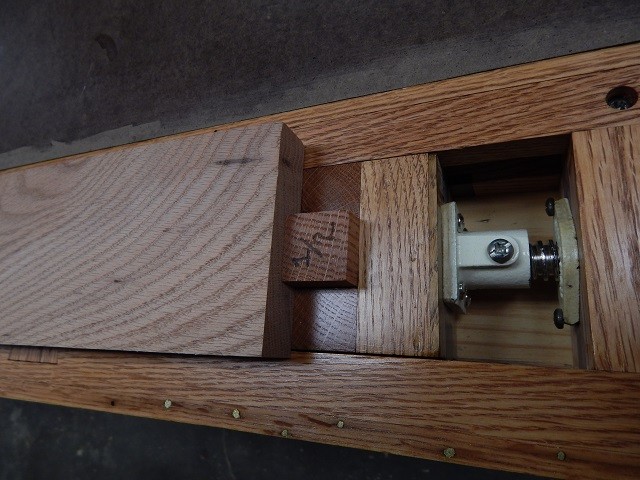
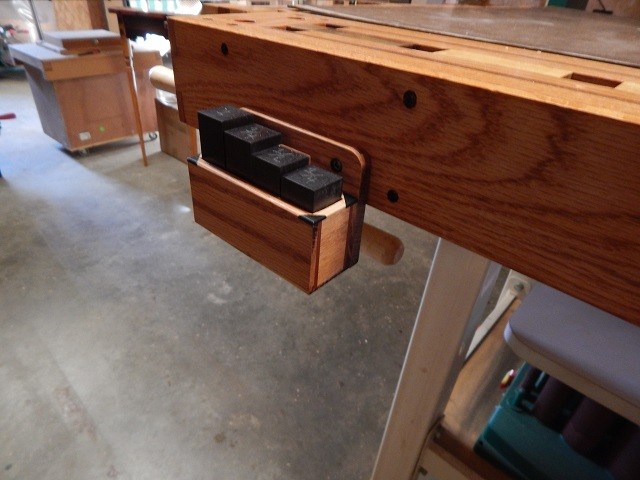
I constructed the housings from local red oak and walnut. The dogs are katalox, one inch square,
with 3/8" walnut dowel handles that I glued/pinned with bamboo dowels. They turned out to
resemble a frozen confection from the Good Humor man's ice cream truck. I laid in brass
gradation lines every quarter inch in one face of the dogs for height adjustment according to
stock thickness (a nice, but non-essential embellishment – I am almost as fond of metal inlay as I
am of shellac).
I raise/lower the dog in the housing via the dowel handle underneath and secure it with a thumb
screw seated in a counter sunk T-nut on the side. Although katalox has a Janka rating of 3,660
lbf, I did not want the thumb screw to eat into the katalox over time. To remedy this I put a
through dado in the side of the dog that could accommodate the dimensions of some powder
coated aluminum bar I had lying around. The bar floats freely but snugly in the dado and is held
in place by the wall of the housing. Thus, it remains down in the housing but always in contact
with the thumb screw as the dog is raised and secured. Tightening the thumb screw places more
evenly distributed pressure on the majority of the dog via the aluminum bar and securely holds it
at the desired height.
It is only necessary to make the housings with three sides as the vise jaw to which it is attached constitutes
the fourth side and completes containment of the dog and sliding bar.
An additional benefit of this design is the convenience of easily lifting the dog and bar out of the housing to clear any dust or debris that may interfere
with operation. Simply drop the dog and bar in the proper orientation into the housing to reassemble.
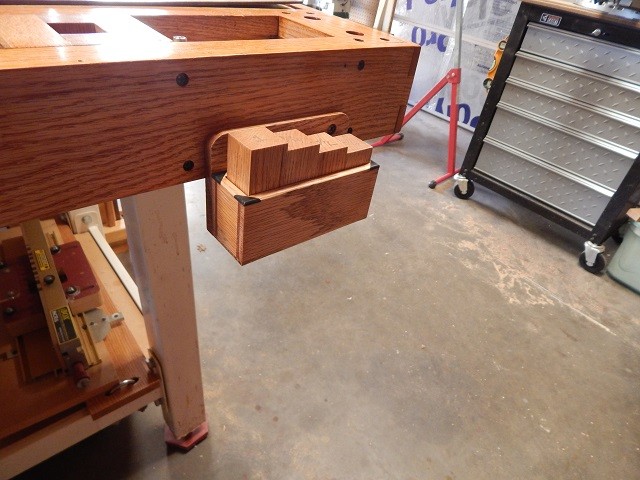
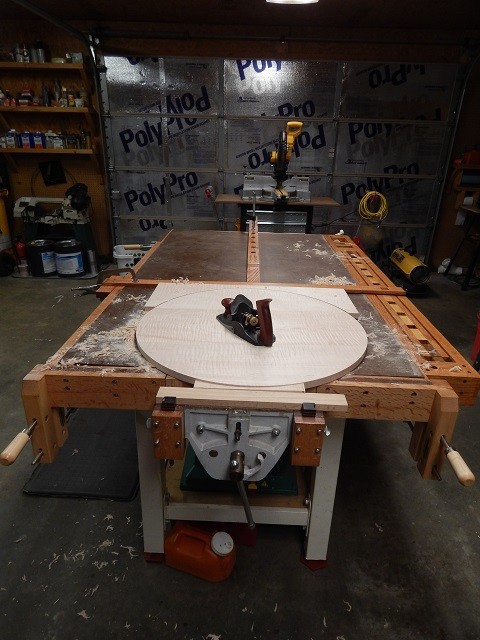
Bench Stop
I confess I installed the end vise dogs/housings before I had a fully distilled notion how to
construct the corresponding dog holes in the bench….without drilling dog holes. Necessity is the
mother of invention and after some rumination, a design emerged. I had two caveats: 1)
construct a bench stop for use with the end vise dogs out of materials on-hand, 2) do not drill any
holes in the work surface. The design of my bench top is not conducive to dogs/holes due to the
plywood construction and the notion of a replaceable Masonite top for finishing. I did not want
finishing materials dripping into dog holes or the issue of drilling new holes in a replaced top
once laid over the substrate with existing holes in it.
Thus, I arrived at the Morganator bench stop design. After two iterations and improvements it
has proved to be reliable and efficient at securing large stock not suitable for the tail vise such as
table tops for hand planning, whether round or rectangular. For round tops I merely use the
radiused cut-offs as cauls.
Iteration 1
– The entire design consists of a T-assembly with a spine and cross member that is
indexed off of the dog holes in the tail vise bed. The assembly can be adjusted down the whole
length of the bench. The cross member is secured in a dog hole in the tail vise bed on one end
and a welder's clamp on the other. The spine mates to the cross member with two metal
registration pins and is secured to the far end of the bench with a C-clamp that seats into a
wooden cleat under the top to prevent lateral slippage. I found the welder's clamp was insufficient to adequately hold once I exerted considerable force with the end vise/dogs. The
wooden cleat also allowed too much slippage with the C-clamp.
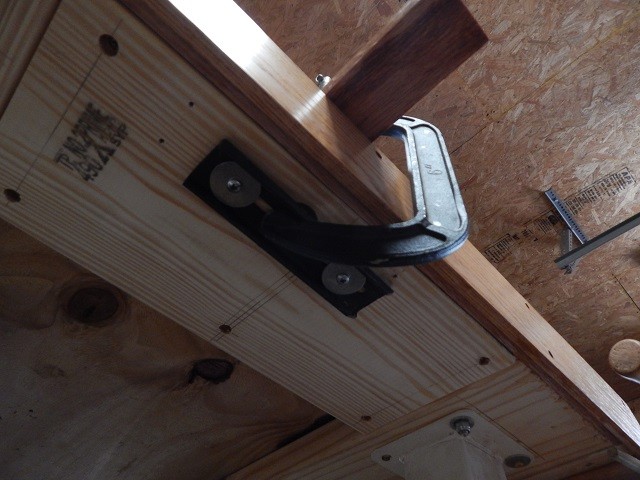
Iteration 2
– Although not readily visible in this photo, I remedied the slippage issues by
replacing the wooden cleat with a piece of aluminum channel to capture the C-clamp pad under
the table, and I drilled a 5/16" hole in the cross member over the oak clamping lip. I used the
cross member as a jig and drilled 5/16" holes the length of the lip as I indexed the T-assembly off
of the tail vise dog holes down the length of the bench, and now drop a 5/16" bolt into the
desired hole.
I had to grind and modify the bottom C-clamp pad for a more square/flush fit as they are not
typically milled flat or refined. A "U" bar or step-over style clamp may be better suited for this
application, rather than a C-clamp due to the distance of the fixed jaws
and the correspondingly exposed amount of the screw necessary to
reach from the jaw to the surface of the spine.
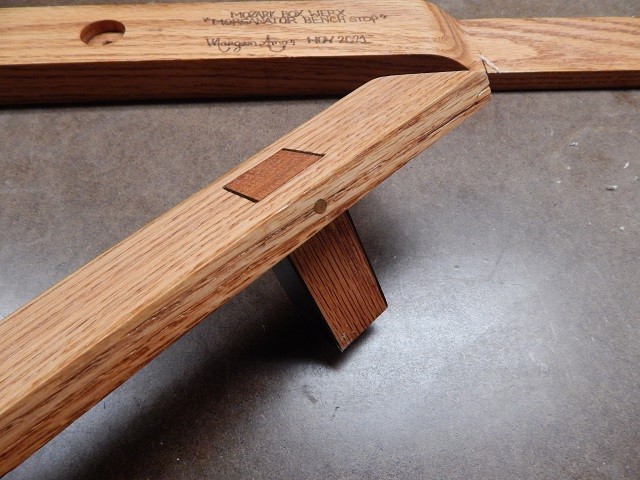
In order to keep the spine mated and affixed to the cross member I took two large deck screws and bored
them into the end of the spine, cut off the heads and ground a bevel on them. I drilled two corresponding
holes in the side of the cross member to receive these registration pins, which keeps them from sliding
or moving apart once under pressure as the end vise dogs press the stock against the T-assembly.
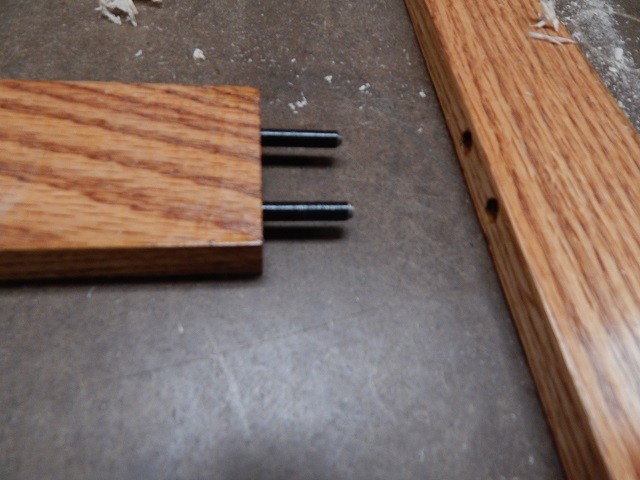
To keep the cross member indexed on the tail vise dog holes I simply made another dog and
inserted/centered it into the cross member and fastened with glue and pinned with a 1/8" birch dowel.
Notice the neck of the spine is stepped down to the same 1/2" inch height as the cross member to permit
passage of a hand plane over the edge of the stock and prevent hitting the T-assembly holding the stock.
Conclusion
I would not recommend replicating this bench in its entirety if you are looking to build one from
the floor up. However, if you are looking to refurbish an existing bench, create a hybrid, or raise
a phoenix from the ashes of your shop without a substantial monetary investment, then hopefully
this has been an inspiration to incorporate some design ideas that are unconventional yet efficient
and effective at producing end results only limited by your talents. I love the challenge of doing
with what I have, rather than dreaming about what I wished I had.
My only regret was using 1/8" tempered Masonite for the top, rather than the desired 1/4"
material I had intended to use. I designed the top to be drop-in and held in place by the bench
skirt and the weight of the material for easy removal/replacement. The 1/4" material was
unavailable at the time and I did not want to drive 45 miles to the next closest source. I drilled a
pencil sized hole in one corner of the bench to lift up a corner of the Masonite for removal. Due
to a reduction in the skirt height by 1/8" and the lighter material I had to lightly tack down the
perimeter with an adhesive, which will still permit removal, albeit
magna cum difficulty
, which
defies my original design. Also, a torsion box design with this top would be a construction
concept worthy of entertainment.
I primarily finish with oils, varnishes and shellacs. The beauty of these materials and tempered
Masonite is that it readily takes all of these with no undue consequences. I merely wipe up and
rub in any spillage and they contribute to the surface's preservation. And yes, I shellacked the
entire top. On occasions when I am gluing or working with other substances that may mar, stain
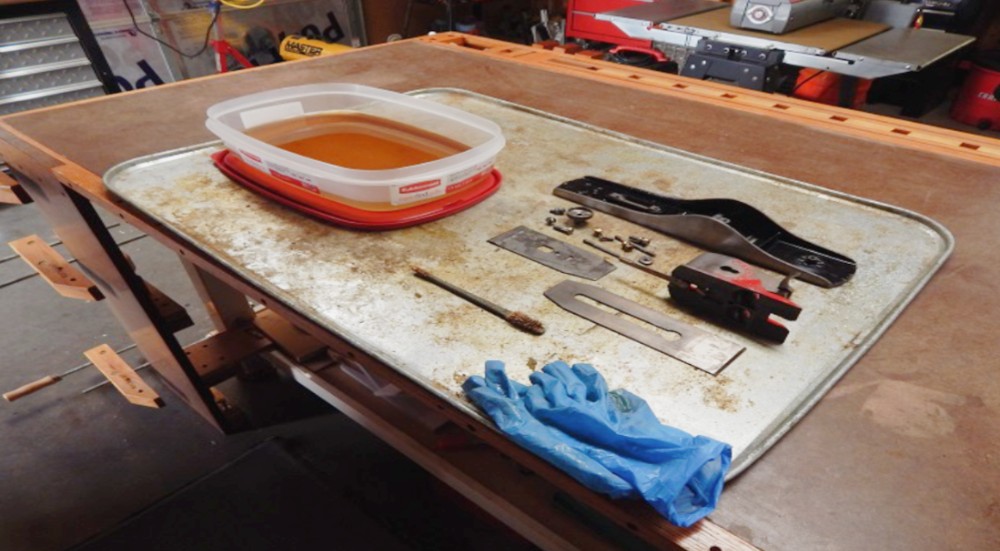
or damage the top I use wax paper, plastic drop cloths, or a sheet metal drip pan such as the one
depicted here while restoring this Miller's Falls No. 15.
Do, don't dream.
Morgan can be reached directly via email at
mozarkboxwerx@gmail.com
.
Return to the
Wood News Online
front page
|