|
Click on any picture to see a larger version.
I have wanted to build a trestle style farmhouse table for a while and
designing the table seemed so overly simple. Why not just make the mortises 1
inch, 25 mm wide? I could make the posts 3 inches, 75 mm square. It works. It
is simple. If one is skilled to an extent, they could probably make one and
never draw plans.
While thinking about this project, I couldn't help but run across many of the
trestle table designs available on internet image search results and videos. I noticed so many
of the pieces had slightly different dimensions. Almost no designers or
builders used the square block design. Their measurements were nearly
arbitrary, yet many looked nice. How did they do it?
A distinction needs to be made before moving forward; I wanted to design a
trestle table that could look good standing on its own. If I were designing a
table for a specific room I would handle things differently. I would balance
my measurements off the proportions of the room.
I designed a few versions of the trestle table before I feel I got it close to
where I am comfortable sharing this design. In this case study of design we
need to start with at least one dimension and a ratio to balance everything
around. For my first design, I used the Golden Ratio, 1.618. I knew a dining
table had to be a certain height, 30 inches or 764 mm, which is most typical in modern
construction. We can take that dimension and multiply it
by 1.618 and get our width, about 48.5 inches, 1236 mm. Multiply it again and
get our length, nearly 78.75 inches, 2000 mm. It is a visually pleasing volume
on the page, and likewise in a room, but in a dining room in a home I can
afford, 48 inches is a bit wide. A length of 78 inches is a bit short for
entertaining even my immediate family, let alone in-laws, children, nieces and
nephews. Visually pleasing, functionally inadequate.
I interject to say measuring or cutting to a specific 1236 millimeters may be a
little lofty for some of us. I reference the nearest millimeter in this article
for those who want to check their arithmetic. This is woodworking, take some
personal liberties when making your own project and measure and cut to the
nearest 1/8 inch, or even whole centimeter, if it is more appealing to work like
that. Moving on...
“What size does work?”
A table that is a bit narrower at 44 inches, 1120 mm wide and 96 inches, 2438
mm long would be great.
We can stick with the 30 inch, 764 mm start point and change the ratio from
1.618 to 1.21. The math does not work in exact increments from one to the next
of 30, to 44, to 96. It does, however, hit close to those numbers over a
series of increments, missing the 96 mark at about 94.375 inches, or 2397 mm.
As Vonnegut might say, “So it goes.” Or cut your table to be 96 inches and
don't tell anyone.
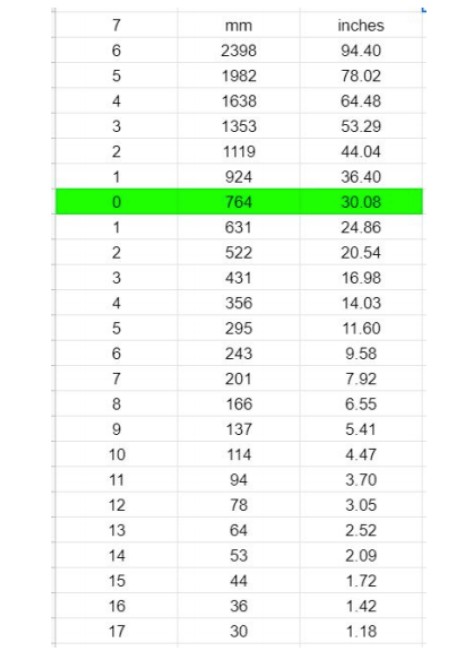
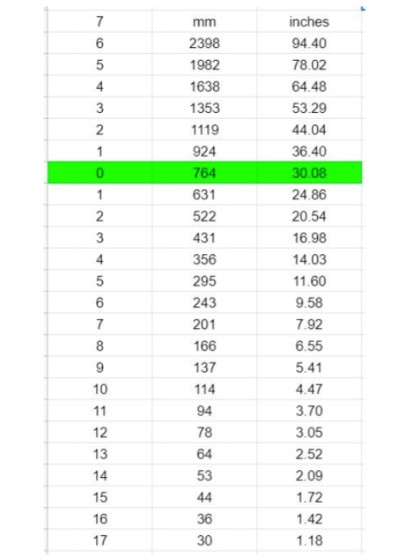
A quick and easy way to figure out these steps and have them around for quick
reference is to create a spreadsheet in a software. One could also spend a minute or
two multiplying or dividing 30 inches, 764 mm, by 1.21, writing the answers as
they go. For our sake, see
Figure 1
.
|
|
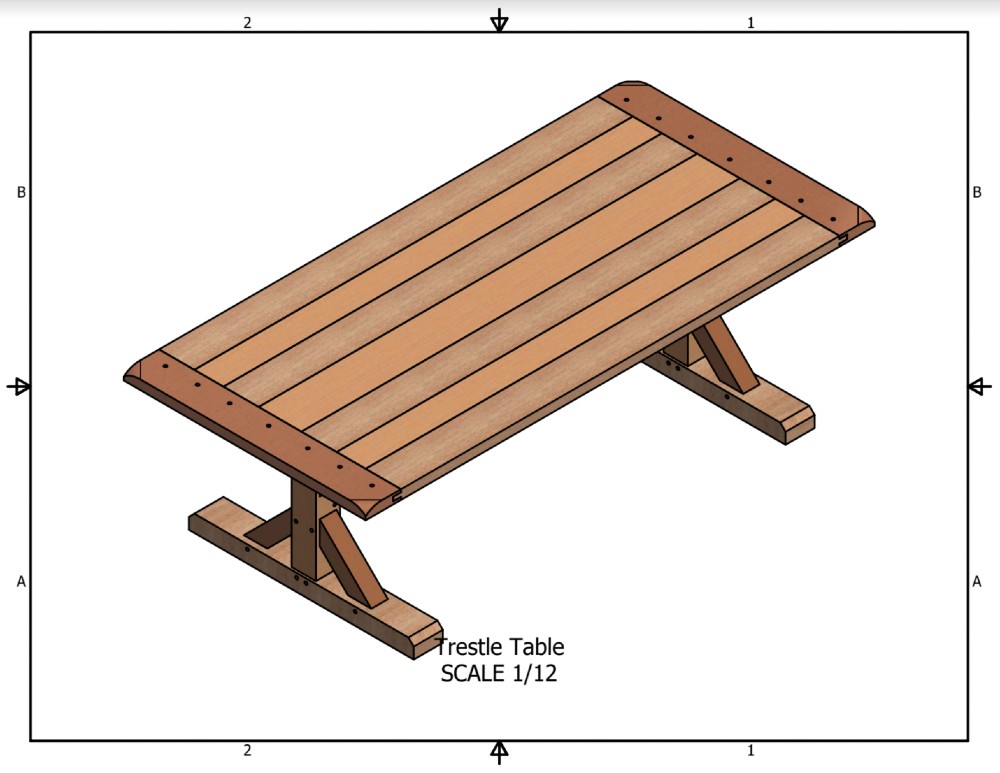
Figure 1.
|
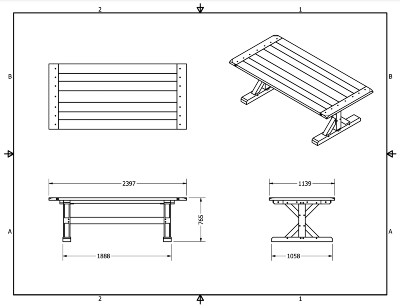
This gets us the overall table, seen in
Figure 2
.
|
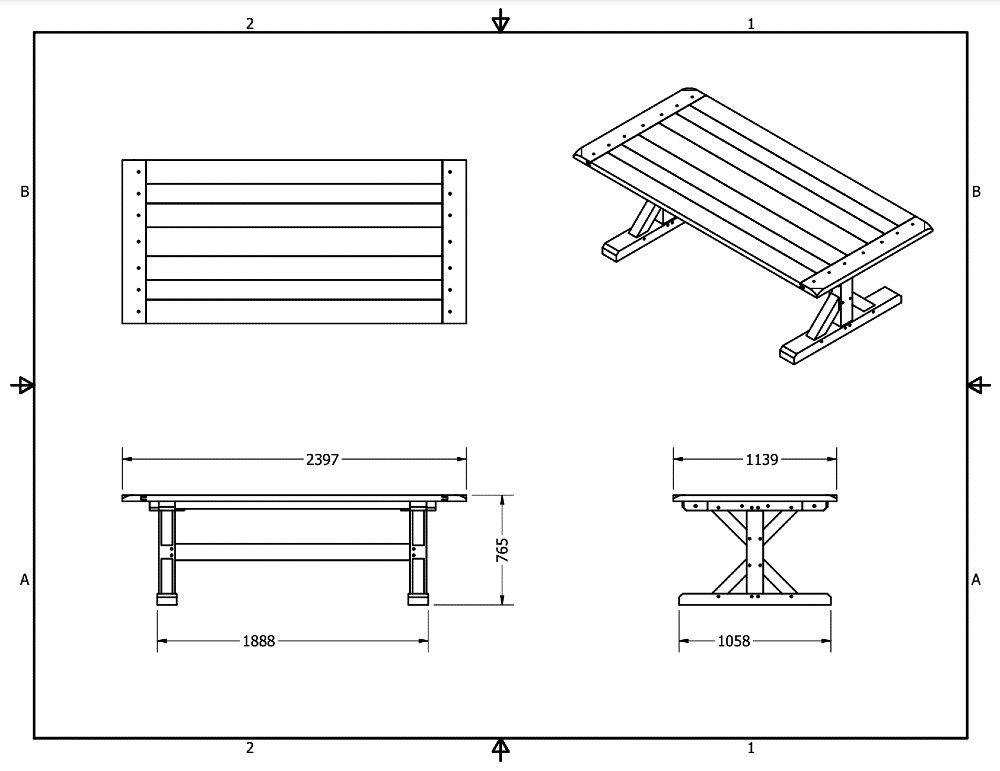
|
Figure 2.
|
Notice the width, 1139 mm, is not what our spreadsheet specifies, which is 1119
mm. Let's discuss why that number is different, and why it may work well in
this situation.
For starters, that is 2 centimeters, about 3/4 of an inch, less than 2% of the width.
We can compromise because we are going to pick up some aesthetics with what we
have going on with the boards that make up the top. The boards in the center
are not all the same width. The center board is 201 mm wide. The two boards
bordering that are 166 mm wide. Out from that is two boards at 137 mm wide.
The outermost boards are again 166 mm wide. Our breadboard end is 166 mm wide.
All these numbers come from our chart and it gives our table's top a visual
appeal. Conversely, one could cut 3 mm off each of the widths of the boards
and get 1 mm off that 1119 mm overall width and likely not notice the
difference.
Our result breaks the grain of the top such that it conforms with the rest of
the features of the table. It also allows for different woods or woods with
different stains to be used and sized in a way that is, again, visually
appealing.
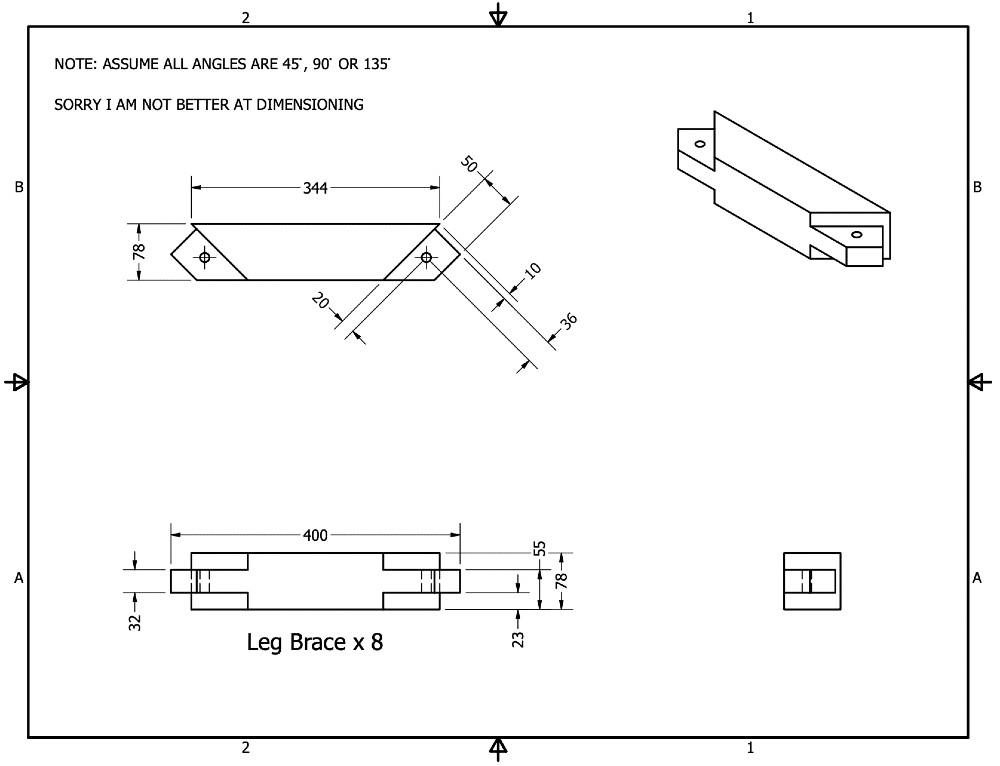
Moving down to the feet and the legs we will consult
Figure 3
and
Figure 4.

|
|
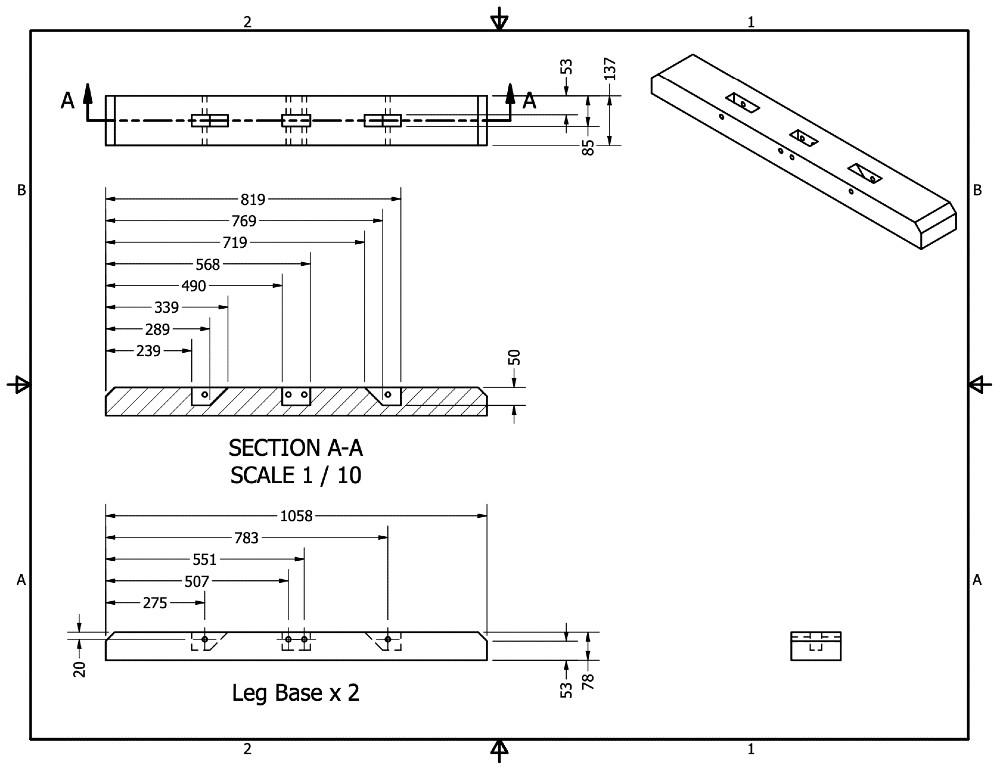
Figure 3.
|
|
|
Figure 4.
|
The angled leg brace is 344 mm long, or at least the section we will see once
the table is finished is this long. 344, that doesn't seem to work. It's not
going to be laying flat when it is finished, it will be on a 45 degree angle.
It's actually going to stand about 243 mm vertically. Consult the chart, and
it works.
The angle brace could be adjusted. Shorten the long 344 mm edge so it is only
about 307 mm, and stands 217 mm tall when on the table. 217 does not work, but
add it to the 78 mm height of the base footing, and they work together quite
nicely, standing at a combined 295 mm. Or make that long length a number
similar to something in the chart.
Even the measurements from our center beam come from the chart. The center
beam is 1637 mm (chart says 1638, so it goes), 114 mm tall and 64 mm wide. If
you wanted to pick two closer numbers on the chart, go for it.
In one version of this model, I went so crazy as to make the mortises
dimensions from the chart. That was too much, in this case, and really doesn't
make any sense. Since the mortises in this design are not going to be seen, it
would make more sense for the person building this table to stick with some
dimensions that corroborate with their tooling. Example, a mortise width of 3/4
inch to 1-1/4 inch, 32 mm in this case, mortise to pair with a specific chisel in
your arsenal should be fine.
One could also break this project down a tad, and use the Golden Ratio, or any
other ratio, to design the legs in relation to the 30 inch height, or any other
measurement. In this case, the top could be however big it is going to be and
our designer not be overly concerned about it. Like we discussed with the top
before, the designer could still use a ratio, likely the same as on their legs,
to divide the center boards on the top to specific widths that add a visual
appeal to the top. The length of the top could determine the breadboard
widths.
I'll spare walking through the rest of the parts, and leave it more as an
exercise for those of you who found this interesting and worthwhile. Keep in
mind, some parts are somewhat arbitrary because they work with something else
to complete an aesthetic across a distance not dimensioned in the drawings. I
intentionally broke a few rules of dimensioning (sorry Dr. D.). When making
the table parts myself, I know how I will have to locate that feature and it
will not involve a granite surface plate and a couple hundred dollars worth of
instruments to locate a hole. I will most likely be using hand tools.
Designing something like this, with features increasing and decreasing in size
incrementally, doesn't have to happen in 1/2 inch or 10 mm increments. We can
easily move away from that and get an array of dimensions that will give us
plenty of options to choose from, that will also be visually pleasing. The
intention of this exercise is to design aesthetically pleasing standalone
furniture.
Moving forward, one could apply the same ratio to a whole room of furniture,
only changing that base value. This practice allows one to uncover a sort of
style of sizing of features that can help someone more easily make a room full
of furniture look nicely together.
I am the designer of the
drawings for the table
and I am including them for
free distribution. Use them as you see fit in your personal work.
Kevin Sullivan is a high school Applied Technology teacher. Along with
engineering, engines and automotive courses, he has taught woodshop courses in
his high school on and off for eight or so years. He has experience working
with hand tools, power tools, and CNC. His first foray into woodworking was
building an electric bass guitar in high school and he has been hooked ever
since. He can be reached directly via email at
atwiniam@gmail.com
.
Return to the
Wood News Online
front page
|